WEB BUTTONS HOW TO'S
 How To's
 Css Drop Down Menu
- Floating Menu Bar
- Create Submenu Horizontal Css
- Photo Slider Frame Menu In Javascript
- Javascript Collapse Menu Demo
- Css Menu Selected
- Css Mouseover Dropdown Menu
- Css Expanding Drop Down Menu
- Mouseover Drop Down Menu
- Fold Out Menu Script
- Drop Down Menu For Html
- Slidedown Menu
- Cascade Menus Html
- Vertical Flyout Menu Tutorial
- Flash Flyout Menu Tutorial
- Css Menu Bar Sample
 Features
 Online Help
  FAQ
FAQ


QUICK HELP
Save your menu.
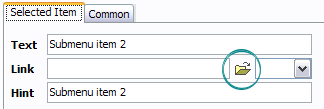
HOW TO CREATE SIMPLE SUBMENU

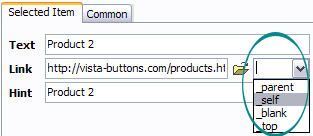
Another way to set the submenu's link is to select it and then click the "Select page" button on the Properties toolbox. Open dialog will appear, in which you can select the page you would like to link to. This page's address will then appear in the "Link" field.
DESCRIPTION
With Vista Web Buttons clear and comprehensible interface, you need just 4 simple steps to get your web buttons or html menu ready and if you use a pre-designed sample as a base you'll end up even faster!
Adjusting menu appearance Dhtml Dynamic Style
Cost Effective Code Javascript Submenu
Créer Un Script Java How To Create Simple Submenu Fully Customizable
RELATED
MENU SAMPLES
Vista Style 2 - Web ButtonVista Style 3 - Html Buttons
Cascading Navigation Bars Vertical Common Style 1 - CSS Button
Tabs Style 6 - Buttons Design
Common Style 4 - Html Button
Common Style 2 - Navigation Buttons
XP Style Olive - Image Button
Vertical Collapsible Menu In Javascript
Tabs Style 5 - Web Page Buttons